Your vibration test results are dependent upon several vitally important and accurate pieces of equipment. One of those key pieces is the transducer – particularly, the accelerometer. Even if you have a top-of-the-line controller and an excellent shaker system, quality testing still requires the ability to accurately control and detect vibrations – a task accomplished by the accelerometer. Consequently, it is important that the accelerometer is accurately calibrated.
Calibration Tips
[1] Back-to-Back-Accelerometers vs. Near Proximity
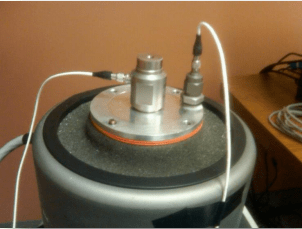
Figure 1: Near Proximity Calibration
Probably the most critical consideration for a good accelerometer calibration is how to assess properly the accelerometer’s vibrations. One option is to place a reference accelerometer as close as possible to the accelerometer you desire to calibrate (the DUT). This is called ‘near proximity’ calibration (Figure 1). It is clearly a good practice to measure vibrations on the reference accelerometer as close as possible to the DUT. The farther the reference accelerometer is from the DUT, the less likely it is that the vibrations are identical.
The best place to measure the DUT’s vibrations is directly below the DUT. This is called “back-to-back” calibration (Figure 2). Mounting the DUT directly on top of the reference accelerometer allows the test to measure almost exactly the same vibrations that the DUT experiences.
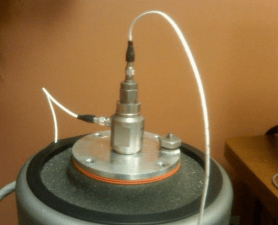
Figure 2: Back-to-Back Calibration
Shaker selection is also critical to achieving quality calibration. A transverse motion will affect the accuracy of the readings. Modes in the shaker table will also affect accelerometer calibration when frequency requirements include higher frequencies. While a quality controller can filter some of the effects of out of band noise, a good mechanical setup is key to accurate calibration.
[2] Good Mounting
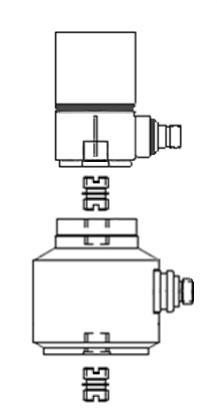
Figure 3: Stud mount used in Back-to-Back calibration
Another very important consideration in obtaining accurate calibration is the quality of the accelerometer mounting. Two things to consider in this regard are the method of mounting and surface preparation. First, it is important to ensure that the best possible mounting has occurred; the preferred technique is to use a stud mount (Figure 3). If that is not possible, use a strong adhesive such as cyanoacrylate glue.
Secondly, it is important to ensure that the surface has been properly prepared. Essentially, that means that there is a consistent, uninterrupted contact between the surfaces. This is usually achieved by applying a thin layer of silicone grease between the accelerometer and the vibrating surface. In addition, it is important not to mount the accelerometer on an uneven or curved surface. A clean, flat surface with a layer of grease will provide excellent contact between the accelerometer and the surface.
[3] Potential Errors and Environmental Factors
Calibration is a technically demanding activity. It requires attention to detail, including environmental factors, to ensure quality calibration results. Some factors to consider while conducting calibration tests are:
- Temperature: is calibration conducted within accelerometer temperature specifications?
- Background Sounds: is the laboratory environment quiet so no audio sounds affect the vibration of the accelerometer?
- Cabling: are the cables appropriately attached to the accelerometer and taped down to avoid whipping so that the accelerometer does not pick up noise?
- EMF: is the laboratory free from background electromagnetic radiation that may affect accelerometer calibration?
- Good Mounting
Good calibration practices extend to saving the data. By carefully keeping copies of data from the calibration, test engineers can compare data from calibration date to calibration date. This ensures that the data is consistent and allows engineers to note any anomalies and recognize normal, acceptable variance.
Be sure to follow these simple tips to obtain a quality calibration of your accelerometer. For directions on how to verify accelerometer calibration in VibrationVIEW, view the Technical Note.